RP Coating – Advanced Software for
Designing Optical Multilayer Structures
| Overview | Purpose | Model | Interface | Demos | Versions |
Demo File: Bragg Mirror
With this demo file, containing a custom form, we can conveniently analyze the properties of a Bragg mirror structure, containing some number of layer pairs with quarter-wave thickness.
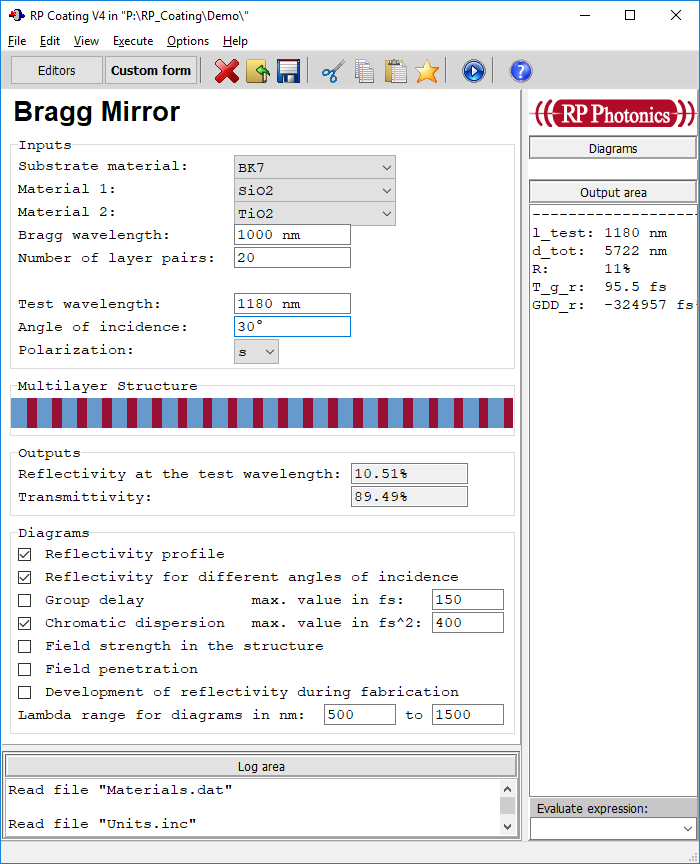
By the way, the underlying script code for defining that structure is rather simple:
beam from superstrate
substrate: (material_s$)
for j := 1 to N_Bragg do
begin
  * (material1$), l/4 at l_Bragg
  * (material2$), l/4 at l_Bragg
end
superstrate: air
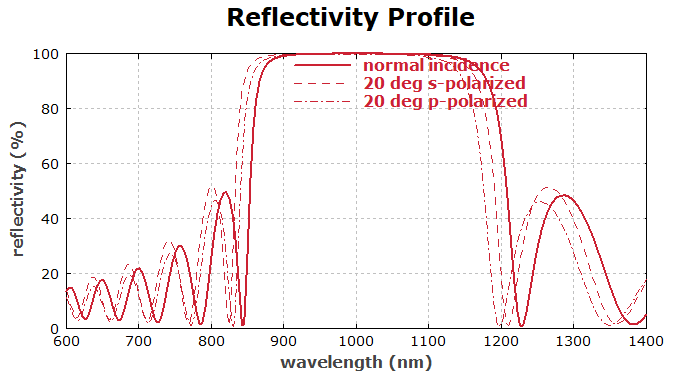
When executing the calculation, we get the following as the first graphical diagram:
The next diagram is a color diagram, showing how the reflectivity spectra vary with the angle of incidence for p polarization:
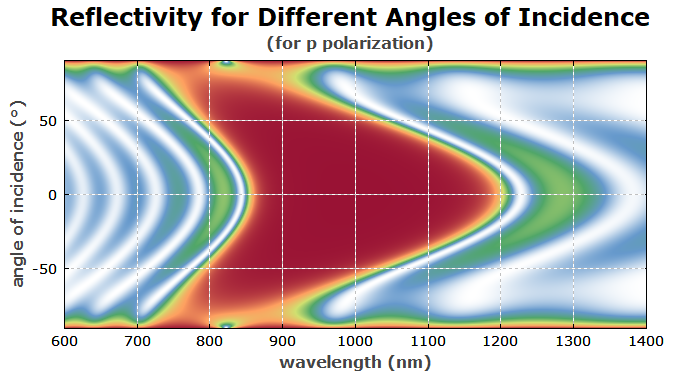
Here is the script code producing that diagram:
diagram 2:

"Reflectivity for Different Angles of Incidence"

[if theta <> 0 then
  ("(for " + pol$ + " polarization, " + str(theta_deg:"°") + ")")
 else
  "(for normal incidence)"]

x: lambda_min, lambda_max
"wavelength (nm)", @x
y: -90, +90
"angle of incidence (°)", @y
frame
hx
hy

if pol$ = "p" then
  cp: color_I(R_p(x, y * deg))
if pol$ = "s" then
  cp: color_I(R_s(x, y * deg))
Additional diagrams, not shown here, contain plots of the group delay and the group delay dispersion as functions of the wavelength.
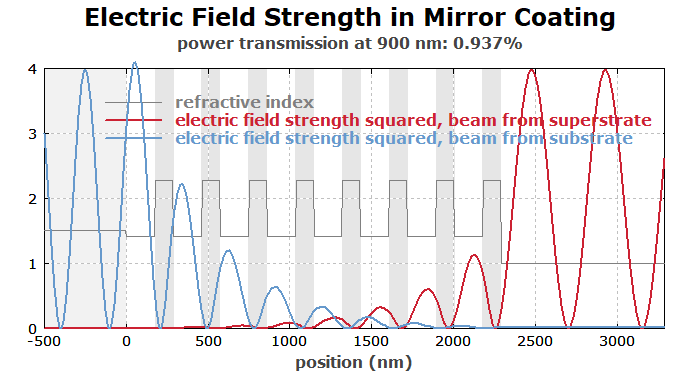
The next diagram shows how the optical field intensity varies within the mirror structure:
Next we make a color diagram showing the field penetration at different wavelengths. For better orientation, we also show the layer boundaries:
diagram 6:

"Field Penetration"

[if theta <> 0 then
  (pol$ + " polarization, " + str(theta_deg:"°"))
 else
  "normal incidence"]

x: lambda_min, lambda_max
"wavelength (nm)", @x
y: -500, get_d(0) + 1000
"depth in the mirror structure (nm)", @y
frame

! begin
    var x1, x2;
    x1 := CS_x2 + 0.02 * ((CS_x2 - CS_x1));
    x2 := CS_x2 + 0.04 * ((CS_x2 - CS_x1));
    for y := CS_y1 to CS_y2 step ((CS_y2 - CS_y1)) / 500 do
    begin
      setcolor(color_I((y - CS_y1) / ((CS_y2 - CS_y1))));
      line(x1 + i * y, x2 + i * y);
    end;
    setcolor(black);
  end

! set_dir(1)

cp: color_I((if pol$ = "s" then
    T_s(x, theta)
  else
    T_p(x, theta); E2(y) / 4)) { color plot }

; Show the layer boundaries:
! begin
    line(CS_x1, CS_x2); { zero line }
    line(CS_x1 + i * d_tot, CS_x2 + i * d_tot); { other boundary }
    setcolor(lightgray);
    for j := 2 to nolayers() do
      line(CS_x1 + i * get_z(j), CS_x2 + i * get_z(j))
  end

"substrate", 150, (-200)c
"superstrate", 150, (d_tot + 200)c
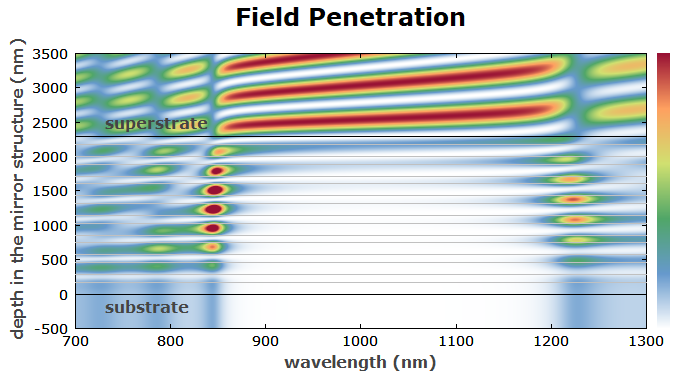
Finally, we want to see how the reflectivity profile evolves during growth of the structure. This requires a little script programming: we need to save the original thickness values and vary them during the plot:
diagram 7:

"Development of Reflectivity During Fabrication"

"for normal incidence"

x: lambda_min, lambda_max
"wavelength (nm)", @x, color = labelgray
y: 0, get_d(0)
"thickness (nm)", @y, color = labelgray
frame

; Save thickness values in an array:
N := nolayers()
defarray d[1, N]
calc
  for j := 1 to N do
    d[j] := get_d(j)

set_d_g(d) :=
  { set the layers for growth up to a total thickness d }
  begin
    global N, d[];
    var d_tot;
    d_tot := 0;
    for j := 1 to N do
    begin
      var d_j;
      d_j := minr(d[j], d - d_tot); { thickness of the layer }
      set_d(j, d_j);
      inc(d_tot, d_j);
    end;
  end

d_l := -1 { last d value set }
R_g(l, d) := { reflectivity for a total growth thickness d }
  begin
    global d_l;
    if d <> d_l then
    begin
      set_d_g(d);
      d_l := d;
    end;
    R(l);
  end

cp: color_I(R_g(x, y))

; Indicate layer boundaries:
f: get_z(j),
  color = gray,
  style = dashed,
  for j := 2 to N
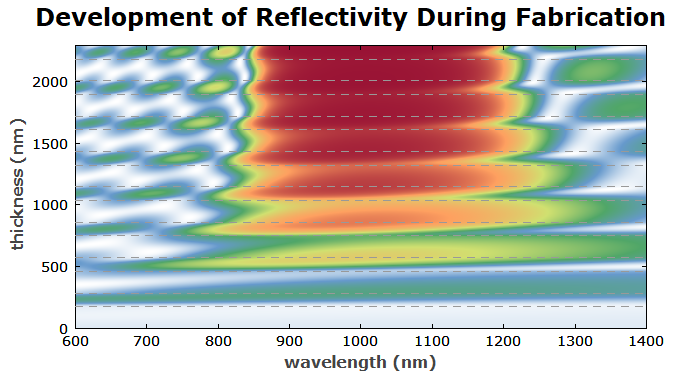
When only the first two layers are grown (bottom part), we get a weak but broadband reflection. Further layers increase the reflectivity, but only in a limited bandwidth.
You can see that with a few lines of script code one can create all sorts of diagrams – not only a few types envisaged by the software developer. Of course, you can use the technical support if you need some hints on how to make a new type of diagram.
How the Custom Form is Made
In the following, you see the beginning of the code (contained in the script) which defines the custom form:
Custom form:
--------------------------------------------------------------
$font: "Arial", bold, size = 20
Bragg Mirror
$font: "Courier New", size = 11, space = 2.1
$def pwidth := 505
$box "Inputs", size = (pwidth, 0):
Substrate material:     ##################
$input (combobox: "BK7", "CaF2", "diamond", "fsilica", "sapphire_o", "sapphire_e", "SF5", "SF8", "SF10", "SF11", "ZERODUR") material_s$
Material 1:             ##################
$input (combobox: "SiO2", "TiO2", "HfO2", "ZrO2") material1$
Material 2:             ##################
$input (combobox: "SiO2", "TiO2", "HfO2", "ZrO2") material2$
Bragg wavelength:       #############
$input l_Bragg_m:d6:"(n)m", min = 100e-9, max = 10e-6
Number of layer pairs:  #############
$input N_Bragg:f0, min = 0, max = 1000
This is what is needed to define the heading and the first few input fields.
